A Comprehensive Guide to the Inspector Tab in DaVinci Resolve
Mastering Video Transformations and Animations Directly in Your Timeline
Unlock the hidden secrets of the Inspector Tab in DaVinci Resolve as we delve into the essential tools for modifying and animating videos directly in your timeline. This guide will take you through each function in detail, providing insights into how to fully utilize these features to enhance your video editing projects.
As always, you can watch the video tutorial at this link below. Let’s dive in!

General Options
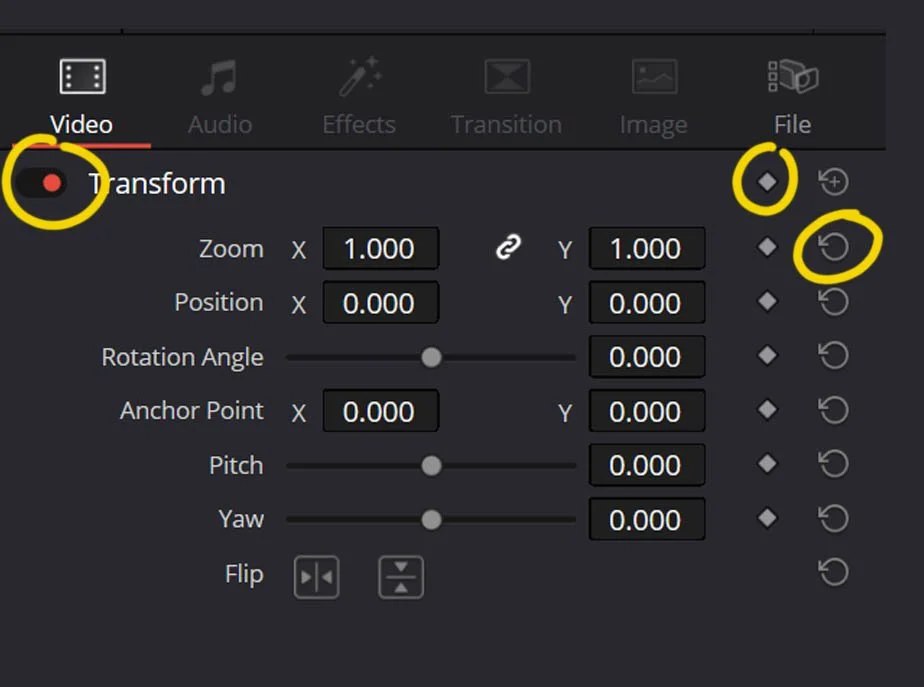
From Right, the Bypass button, the Keyframe rhombus and the Reset Property button.
Let’s first look at the options that are common to each property. Any effect has a Reset button, which is the Icon with the Arrow going clockwise. If you click it you’ll delete all modifications on the property. If you click the Icon at the main property level, you’ll delete ALL properties in the Tab (for example, all Transform modifications).
You also have a Bypass button, which is the orange circle on the top left. Click it, and the effect will be bypassed, but the modifications will stay. Most effects can be animated by pressing the Keyframe icon (rhombus shape) next to the property. More on keyframes and animation later in the article.
Transform
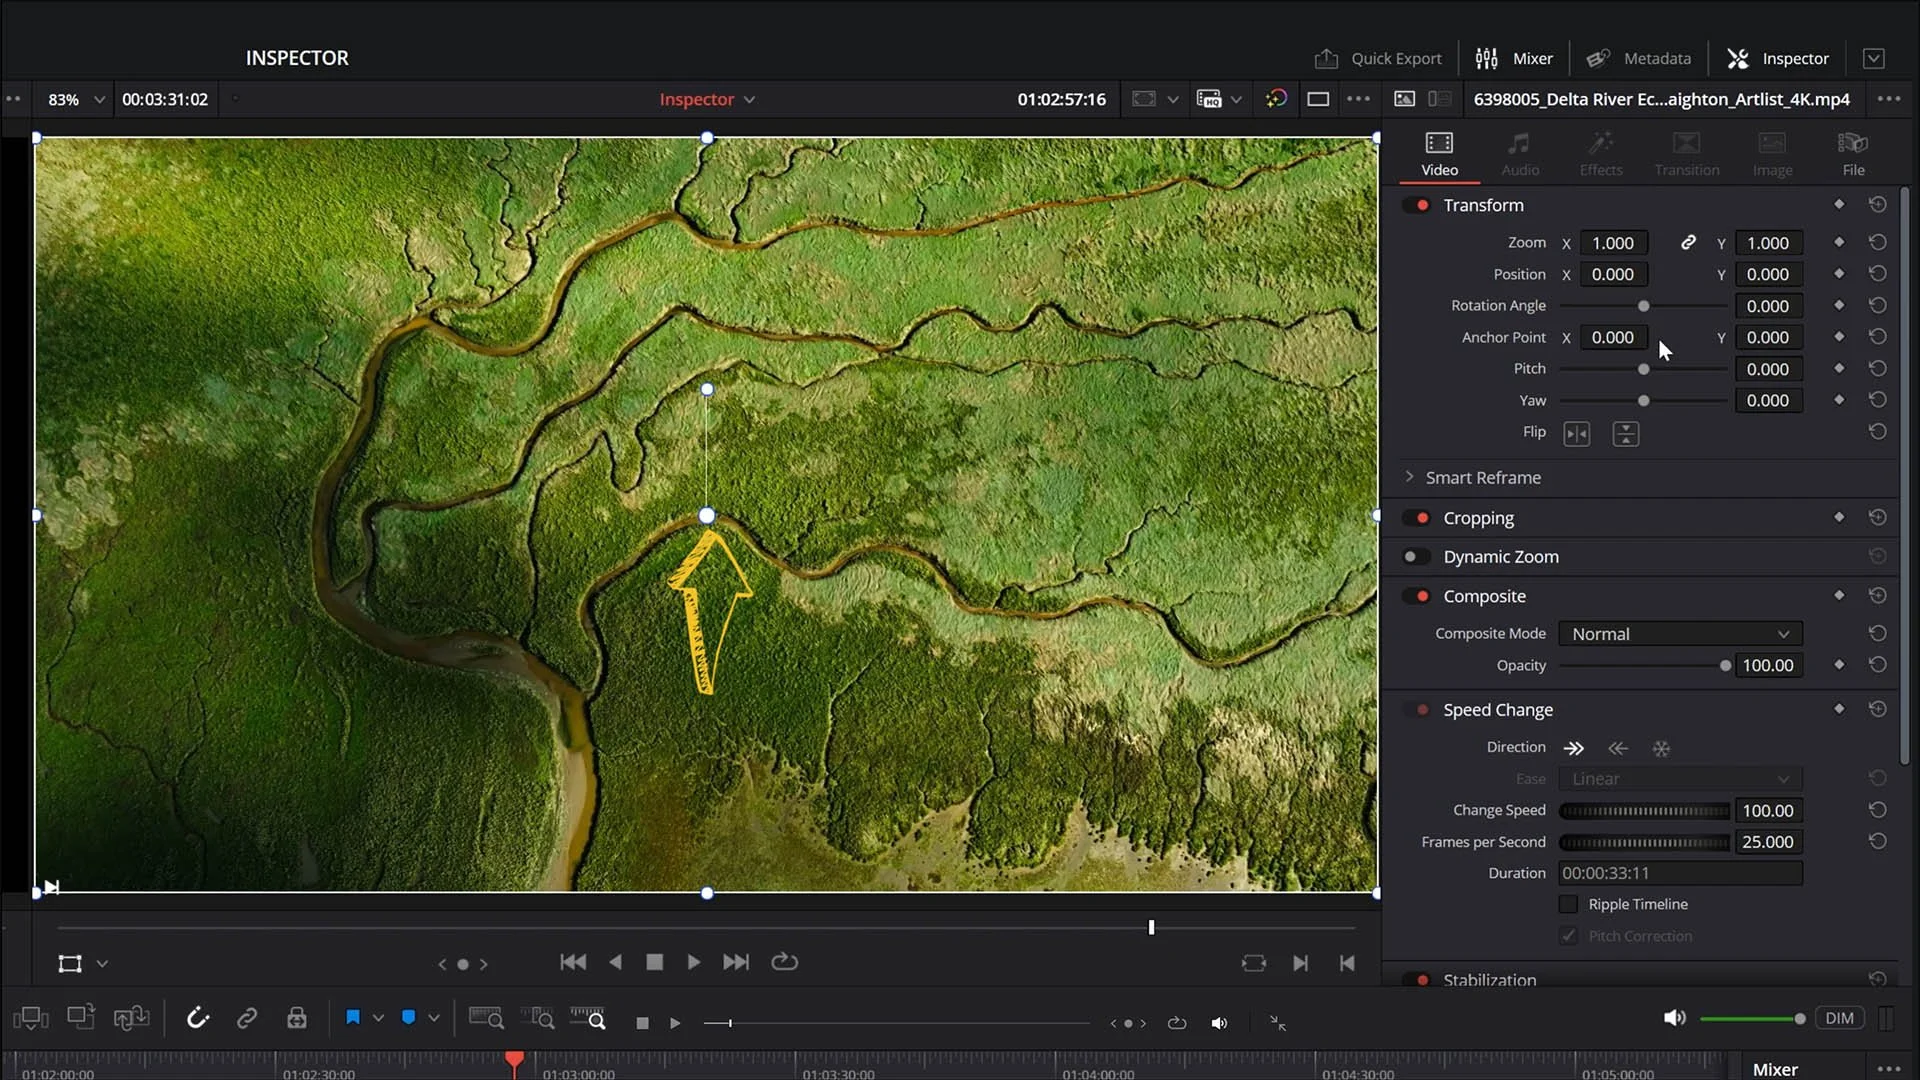
The first section in the Inspector is Transform. It is dedicated to modifying the Scale, Position, and Distortion of your video. Here, you can zoom in and out, change the position of the video, and rotate it. These properties are all pretty common in any editing or video post-production software.
The Anchor Point is a bit more interesting. It refers to the center point from which to apply all these modifications.
The Anchor Point highlighted by the arrow in the Viewer
Here’s a real-life use example: when you have a cut in a person speaking and you want to hide the cut, one solution is to zoom in on the next clip so the image is different enough that the lapse in time is not as apparent. Here, the trick is to center the eyes between the two cuts so that the point where the audience looks stays the same.
Place the anchor point between the eyes and zoom in, and you’ll be sure that the point of interest stays fixed.
Let’s move on. We now have Pitch, which inclines the plane in 3D on the X-axis, and Yaw, which does so on the Y-axis. These two tools are used if you need to adjust the perspective of a clip that was shot pointing upwards, for example. But let’s be honest, you’ll not touch these often.

Yaw inclines the video in 3D on the Y-axis. Here in action.
In the Studio version of DaVinci, there’s also the Smart Reframe option. This tool analyzes the clip and centers it for you in the viewer. It is useful if you’re converting your videos into vertical format and want a quick way to reframe things. You can either use it automatically, or select the Reference Point mode, which lets you draw a box around the part of the video you wish to center.
Cropping
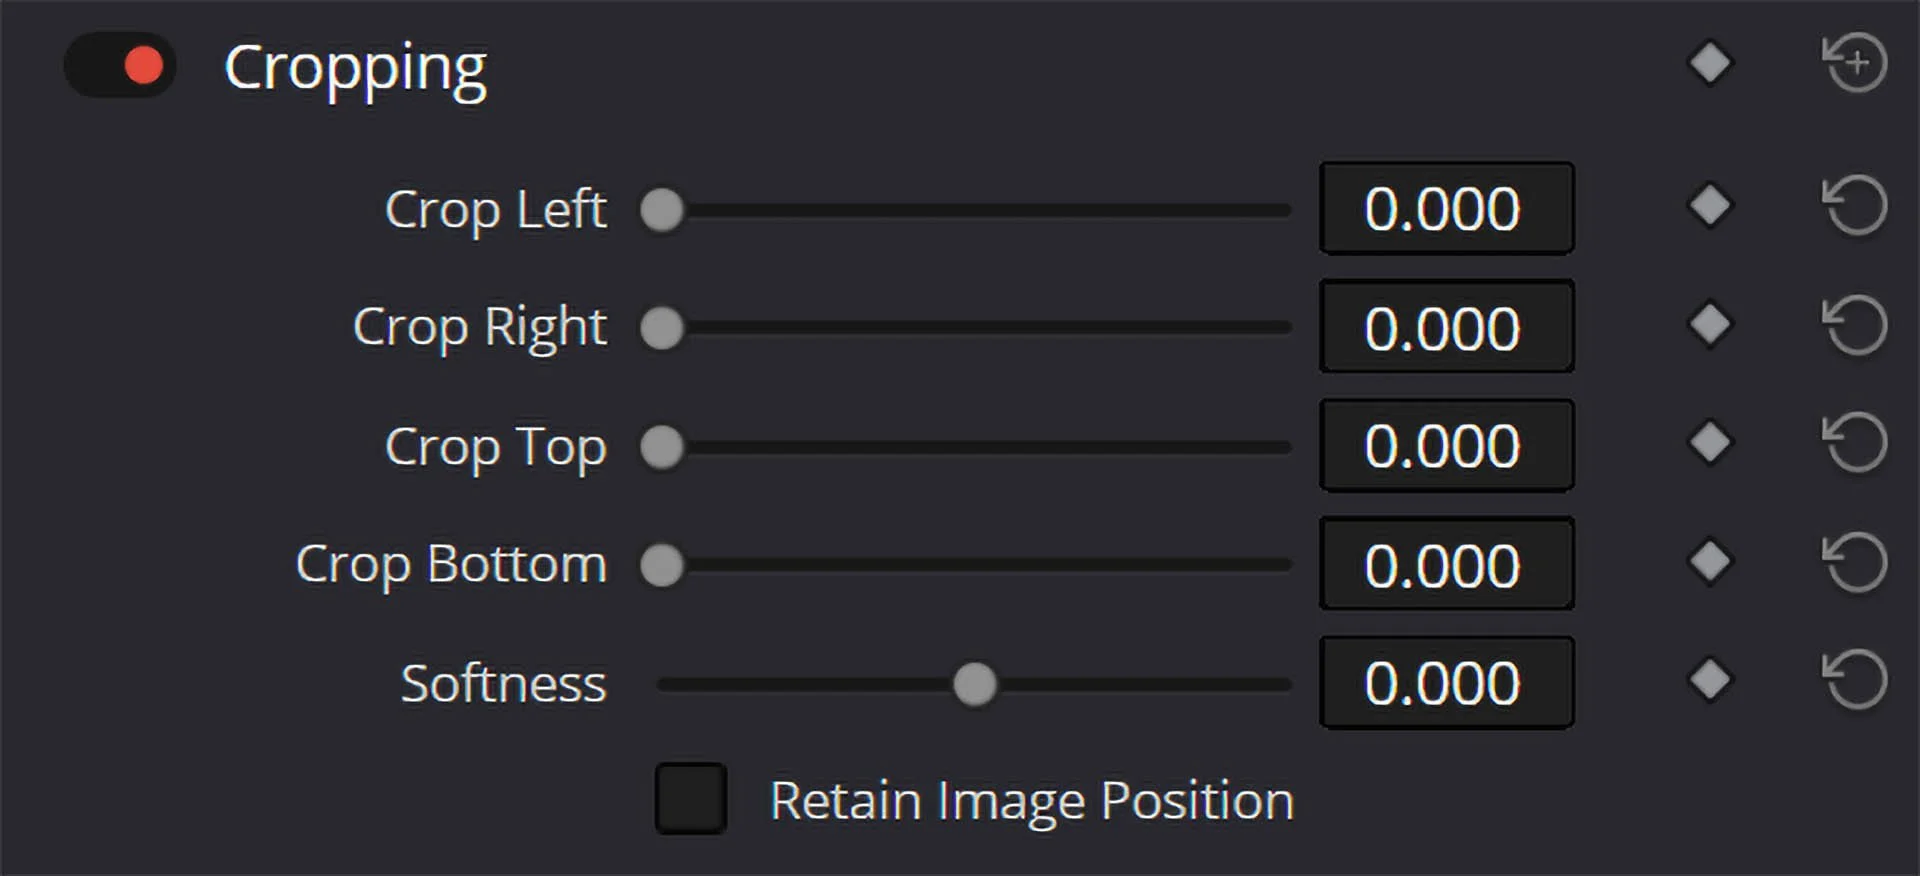
Cropping is a way to cut your image into different shapes without using a mask. You have four options for cropping, which are the four directions: Left, Right, Top, or Bottom. The last slider is for Softness. Move it to the right to make the border fade outward, or move it to the left to make it fade inward.
It is important to note that the cropped part of the image is not black but transparent. So if you place another video beneath it, you’ll see it.
Dynamic Zoom

The Dynamic Zoom is another somewhat new feature in DaVinci. You can activate it by clicking on the Bypass Icon (by default, the option is bypassed), then clicking on the menu on the bottom left of the Timeline Viewer and selecting Dynamic Zoom.
You’ll now see a green and a red rectangle. These represent the parts of the image visible at the start - Green - and the end - Red - of the effect. The transform will move from one position to another.
Here, you can do zoom-ins and zoom-outs, lateral pans, or both. The movement will last for the entire duration of the clip. To exit this view, press the menu on the bottom of the Timeline Viewer again.
Going back to the Inspector, you can choose between four effects:
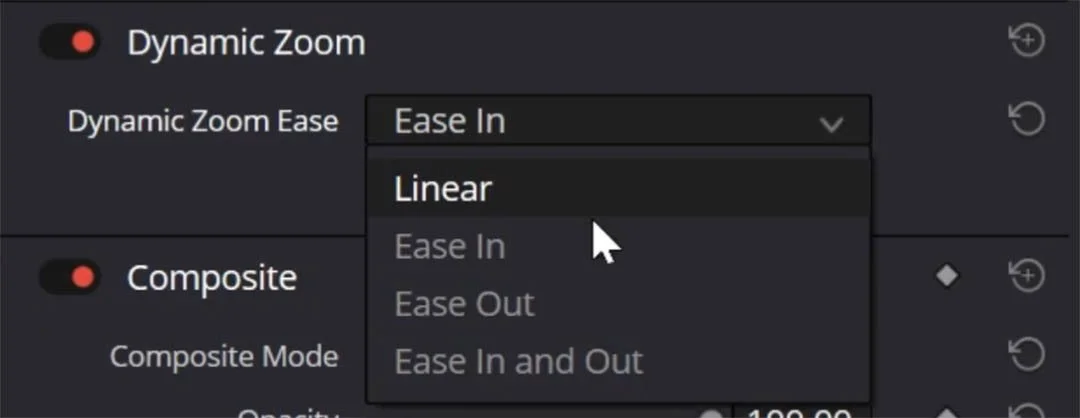
Linear – the clip moves at a constant speed between the two points.
Ease In – slows down at the Start.
Ease Out – slows down at the End.
Ease In and Out – slows down at both the start and end.
There’s also an option to Swap the two rectangle positions. I kind of like this tool, although, to be honest, I mostly forget it exists. But it might work for you, so give it a try.
Composite Modes
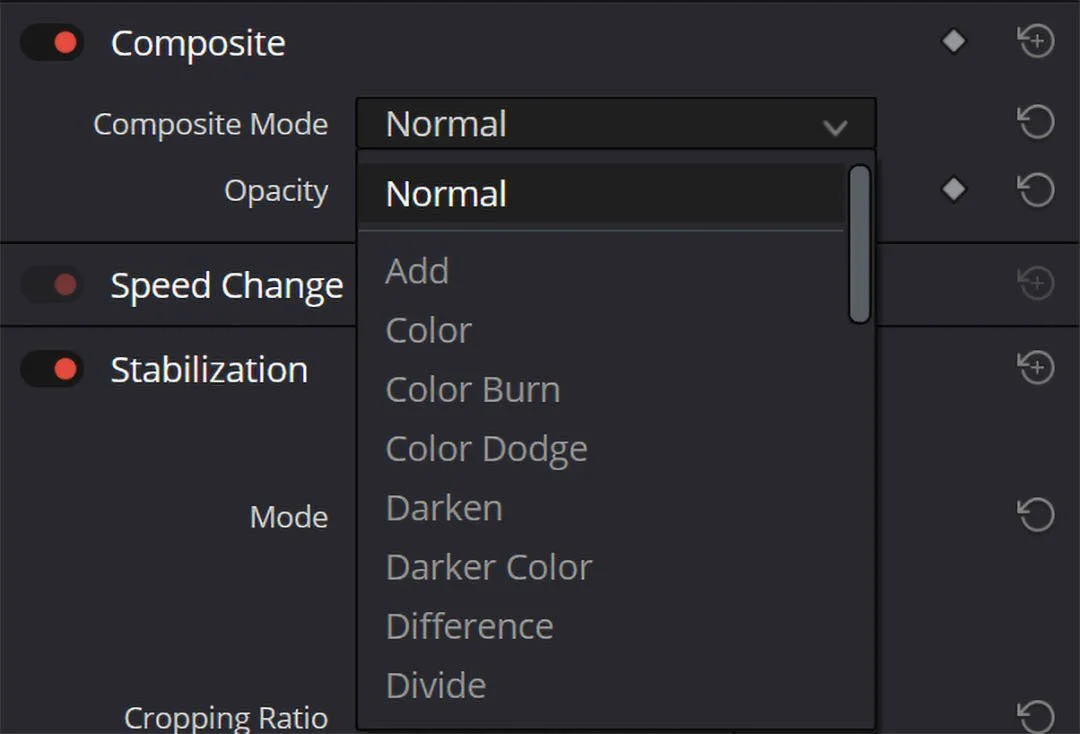
Composite lets you fuse different videos together using a variety of blending methods. You'll need two clips stacked on top of each other in separate tracks. Then, you'll have to apply the effect to the top one; otherwise, you won't see the effect.
The most common blending modes are:
Add – adds the top image to the bottom one.
Subtract – subtracts the top image from the bottom one.
Screen – adds only the lighter parts.
Multiply – adds only the darker parts.
Overlay - sets middle gray as 100% transparency. Everything above or below gets added to the image, from 0% of middle grey to 100% at black and white.
Most other effects are variations of these, so experiment to see how they work and familiarize yourself with them. I'll do a separate video on how all these methods work, but for now, just play with them to get a sense of how they operate.

Two videos composited in Overlay mode.
Speed Change

Speed Change lets you accelerate or slow down a clip. You have two sliders to control the Speed, called Change Speed and Frames per Second. They both have the same effect on the clip, just with different logic- the first prioritizes speed, the second fps. You can also enable Ripple Timeline by checking the box, and DaVinci will shorten or lengthen the duration of the clip while you adjust its speed, by keeping the content of the clip intact.
You can also choose to reverse the clip or freeze it by clicking the two icons in Direction, above the speed change gear. If you freeze a clip, DaVinci will create a ghost cut at the position of the Header Scroller and freeze the frame you’re currently on for the rest of the clip in the timeline.
Stabilization
Stabilization lets you reduce shakiness in your footage. It either works or it doesn’t—meaning that if you see artifacts on the clip after stabilizing, it means that the algorithm has failed to understand the footage, so there isn’t much you can do about it.
You can play with three different algorithms DaVinci provides:
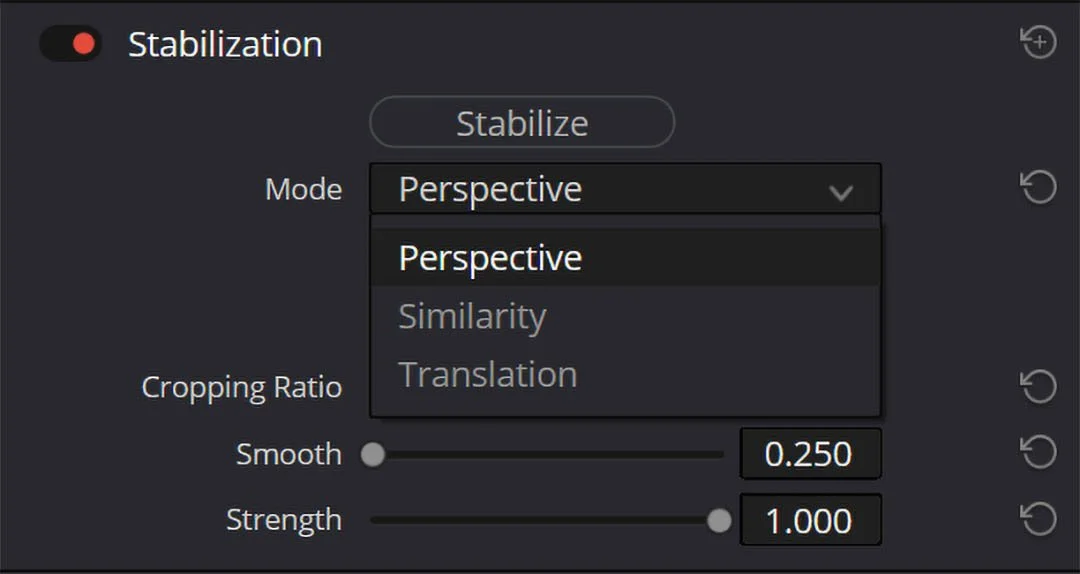
Perspective – looks for straight lines and solids. It tries to correct the perspective movement of a shot. Best used when there are no people in the shot and you want to preserve the proportions of objects, such as houses or cars. It’s more precise but can sometimes get confused.
Similarity – best used with people because it slightly deforms the entire image to match previous frames. If you have solid objects, you might notice distortion. Similarity is generally my go-to stabilization mode.
Translation – looks for simple movements, such as a side dolly shot, and tries to stabilize them. It is the weakest mode, and I almost never use it.
Once you’ve chosen your stabilization method, you can choose to apply Camera Lock, which tries to keep the image completely still, or uncheck Zoom, which automatically zooms in to hide stabilization artifacts. I’d suggest leaving both as they are.
Then, you have sliders for Cropping Ratio, Smooth, and Strength. My recommendation is to keep the effect as subtle as possible. I usually decrease Strength to 0.5 and leave the other two as they are, then adjust based on the result.
Lens Correction
Lens Correction analyzes the image to detect any curvature caused by the lens and applies a correction. To use it, click Analyze, and the program will automatically set a value for Distortion. After that, you can adjust the slider to fine-tune the result.
Retime And Scaling

Under Retime and Scaling, you can modify the settings for individual clips compared to the overall project settings.
The first and most useful setting is Retime Process. This comes in useful when you have a clip in the timeline that you want to slow down but was not shot in slow motion - hence, if you slow it down, the movement is choppy because you can see the missing frames. Select the clip, then from the dropdown Menu in Retime Process select Optical Flow. The effect will analyze the frames and create ghost frames between the real ones to make it look less choppy. It works pretty well with solids, but it has issues when you try to slow down gases or liquids.
Motion Estimation lets you decide which algorithm to use in Optical Flow. You can choose between Standard, Enhanced, or Speed Warp. The lower the algorithm, the better the results will be, and the longer it will take DaVinci to process the effect. I suggest leaving the standard project settings and changing it only if the effect is not working properly.
The next two options are about scaling and framing. Scaling lets you decide how a clip should behave if it is not the same aspect ratio as the timeline. You can choose to:
Crop - It keeps the original size of the clip and cuts out any part that does not fit in the timeline.
Fill - it fills the frame with the clip, covering any black space. It might crop our part of the clip.
Fit - it fits the whole clip into the timeline, leaving black space around the clip.
Stretch - it fits the clip into the timeline, covering all black space, by distorting the clip. The clip, of course, loses the original proportions.
It is usually a setting that comes into play when you’re doing multiple formats, for example, vertical and horizontal for social ads, and you need to quickly resize the timeline.
Resize Filter allows you to choose which algorithm to use when resizing an image. When you change the size of an image, the original pixels will not perfectly align with the new ones, so you need a method to recalculate each pixel to the new position. Here, you can change the calculation method. Here as well, the first methods are usually the faster ones, while the lower you get, the better and the longer.
If you plan on learning Compositing, I’d suggest looking into these different algorithms.
SuperScale

Lastly, there’s Superscale. Superscale is useful when you have a tiny video that shows the pixels when stretched to your timeline’s dimensions. Super Scale allows you to interpolate the image to create new pixels to fill the gaps between the existing ones.
You can go by 2X, 3X, or 4X, and here as well, the latter is the better and slower one. If you have an NVIDIA card, you’ll also see the option to use Graphics Acceleration, which I’d suggest using.
Be prepared that the effect is quite buggy, and it can cause DaVinci to crash.
Animation & Keyframes In DaVinci
Let’s go back to animation. Any property that has the rhombus icon can be animated. When you press the rhombus, you’ll create a keyframe, which is a save point of the property’s values in the position of the timeline scroller. You can then move to another point in the timeline and change the property, and DaVinci will automatically create another keyframe in the position. Then, it will interpolate between the two positions.
You can check the keyframes in the timeline by pressing the rhombus icon in the clip. Here, you’ll see where the keyframes are in the timeline, and you can select them, move them, or delete them.
Let’s see how to use keyframes in different effects.
Most are quite straightforward: if you want to animate the zoom throughout the clip, select the clip, go to the first frame, and press the keyframe icon. Then, press Arrow Down to move to the next cut, then Left Arrow to go to the last frame, and change the zoom property.
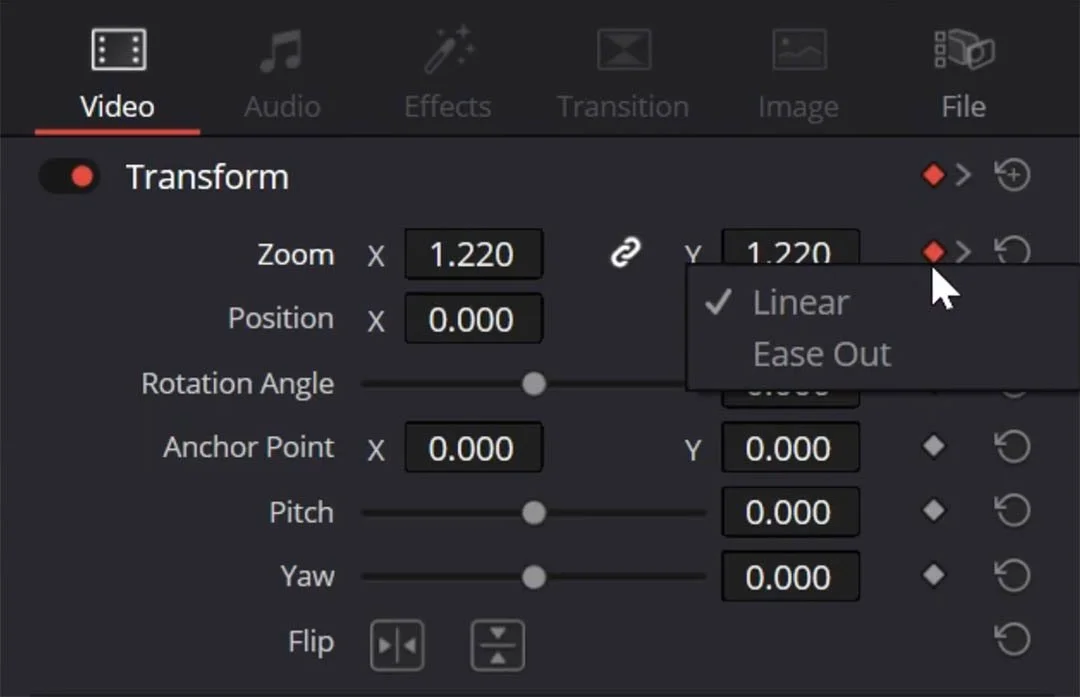
If you want to add a little curve to the movement, you can right-click on the keyframe and select Ease Out for the start of the movement and Ease In for the end, and the animation will accelerate and decelerate at the end.
You can animate any property at the same time.
Speed changes in the Inspector are a bit more complex. When I work with speed, I prefer to use the Retime Controls function, which you can access by right-clicking on the clip and selecting Retime Controls, or pressing CTRL + R - or CMD + R on a Mac.
To start, I place a keyframe where I want the clip to change speed by clicking on the dropdown menu and selecting Add Speed Point. Then, I click the dropdown menu in the middle section and select one of the suggested speeds in Change Speed.
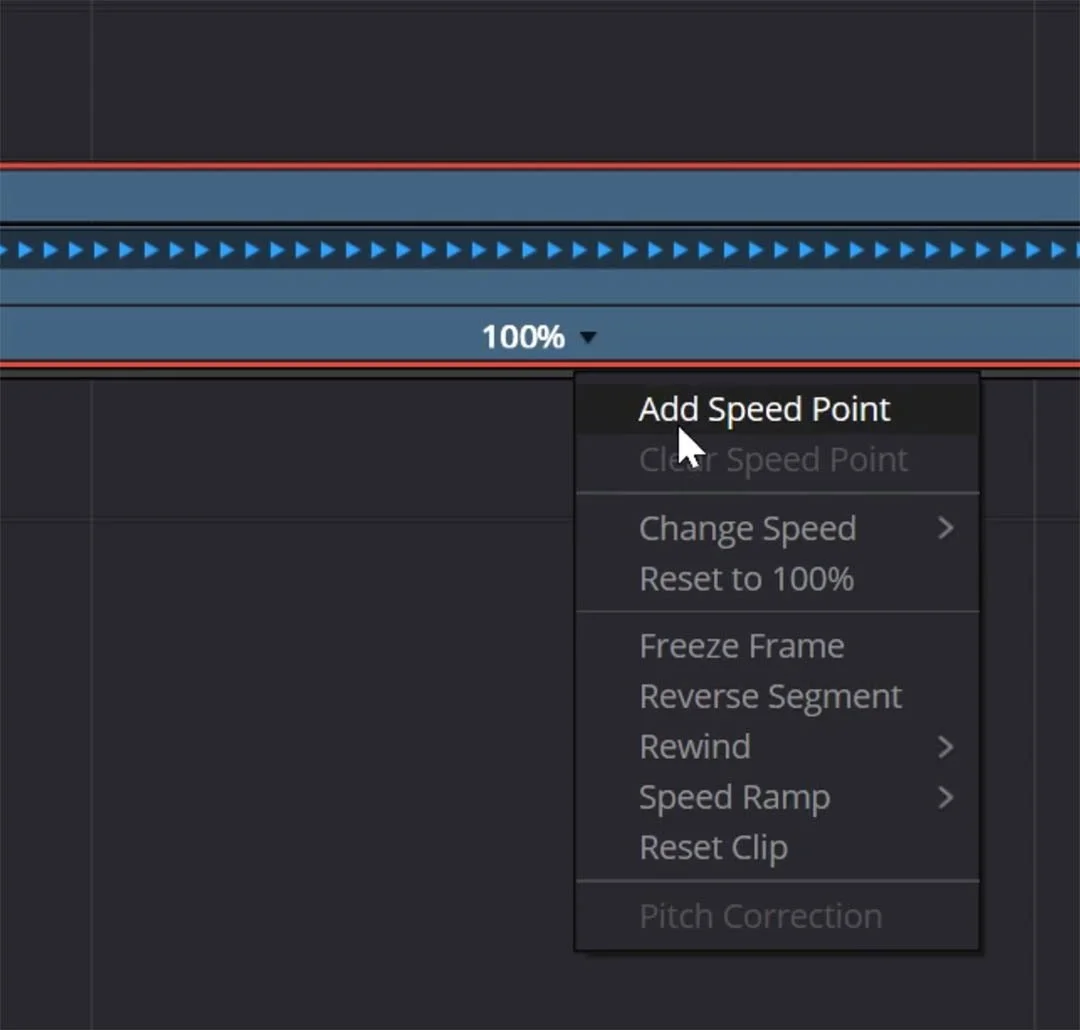
To better control the effect, it is a good idea to open the Retime Curves, which you can find by right-clicking and selecting Retime Curve.
Here, you’ll see the shape of the curve. You can adjust the speed by dragging the line upwards or downwards. Then, you can apply an ease curve to the speed, which by default is Linear, by selecting the keyframe and pressing the curves icon. You can adjust the ease by pulling the tangent on the keyframe.
Lastly, when I create a speed warp effect, I go back to the Inspector, activate Optical Flow, then select Speed Warp as my go-to algorithm. Optical Flow will generate any missing frames, creating a smooth and pleasing effect.

A smooth Speed Warp curve, created using Retime Controls and Retime Curves,
Remember that if you animate nodes in the Color page, DaVinci will not automatically create new keyframes when you change the property. You’ll first have to create the keyframe, then change it. If you don’t, nothing will happen.
Conclusion
This thorough exploration of the Inspector Tab in DaVinci Resolve equips you with the tools and techniques to transform and animate your videos effectively. With these skills, you can elevate your video projects, ensuring they stand out with professional-grade editing. Now, armed with this knowledge, you're ready to tackle a new editing challenge: editing using only one track.
To know why and how, watch this tutorial!

Learn how to use nodes in DaVinci Resolve for professional color grading. This step-by-step tutorial covers serial and parallel nodes, primaries vs. secondaries, LUTs vs. CSTs, and the best node order for consistent, cinematic results.