Understanding Nodes and Node Order in DaVinci Resolve
This article explains how nodes work in DaVinci Resolve and in what order to apply modifications and effects for clean, consistent color grading.
If you already know DaVinci, you can jump to the Nodes Order chapter below. If instead you’re new to the subject, I suggest reading my tutorial on how to read Video Scopes, before jumping into this one.
You can also download the clips I’m using in this tutorial from this link.
As always, you can watch the video tutorial at this link below. Let’s dive in!
Types of Nodes and Connectors (Inputs, Outputs, Alpha)
Nodes are displayed in the Color Tab. The signal travels from left to right, getting corrected by any node it finds along the way.
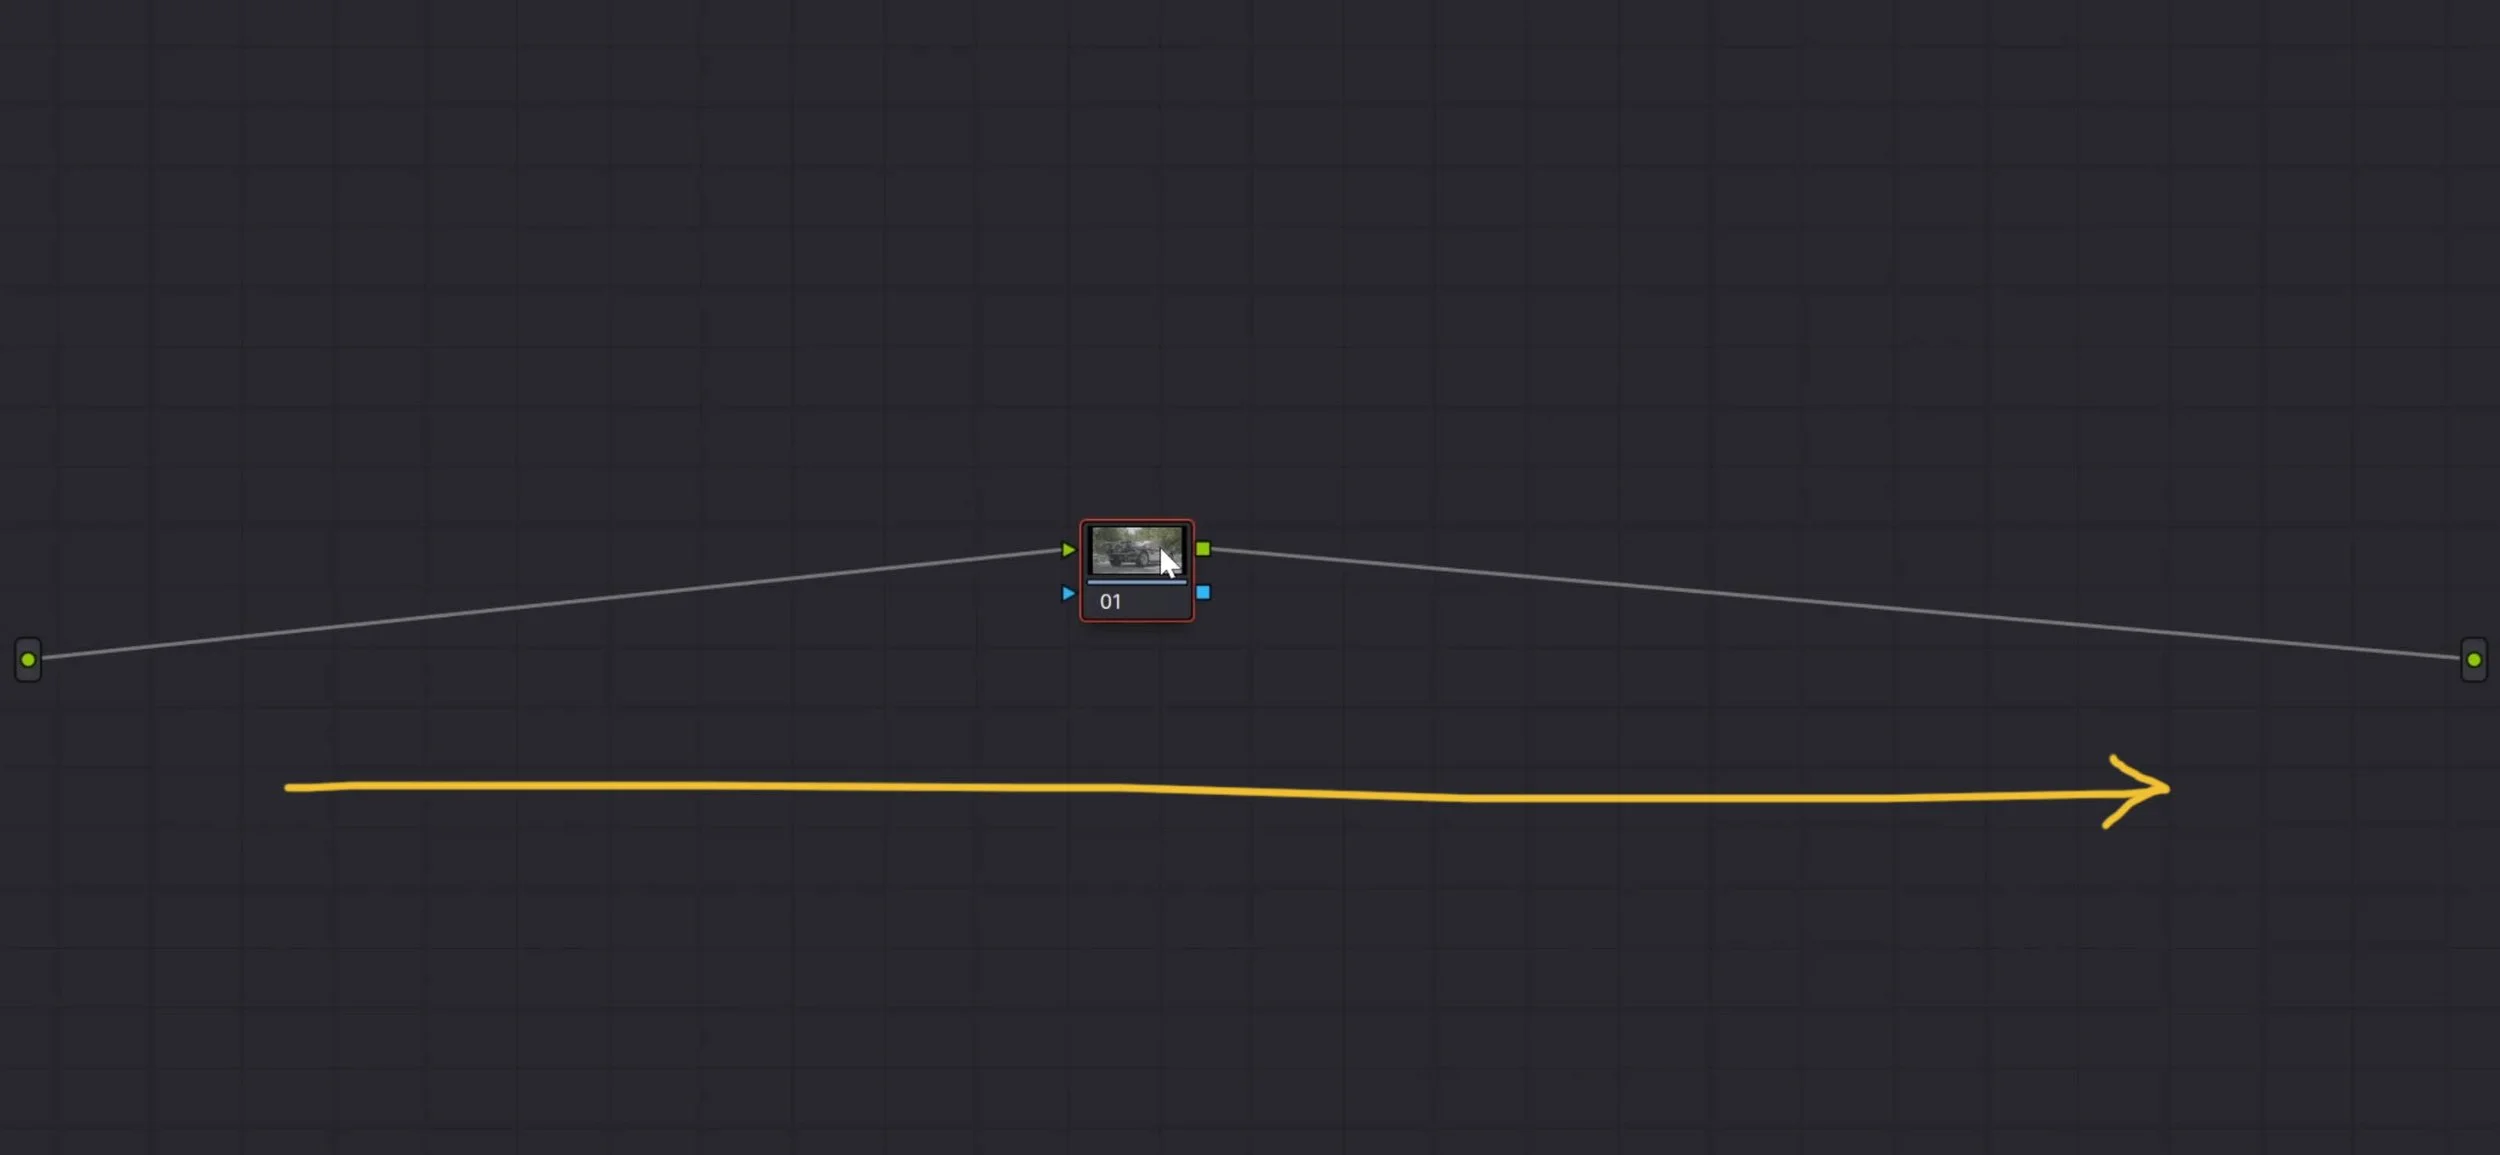
The signal direction in the Color Tab.
There are two dots on the side of the node window: the left one is the clip input, and the right one is the clip output.
Each node has two inputs and two outputs. The green inputs/outputs transfer the RGB channels, while the blue ones transfer the Alpha channel (the transparency mask for effects). Keys are indicated by a dotted line.
There are two types of nodes:
Serial Node: a node that follows another node and receives the image from the node before, thus it is affected by its changes.
Create one after the selected node: ALT + S (Option + S on Mac).
Create one before the selected node: SHIFT + S.
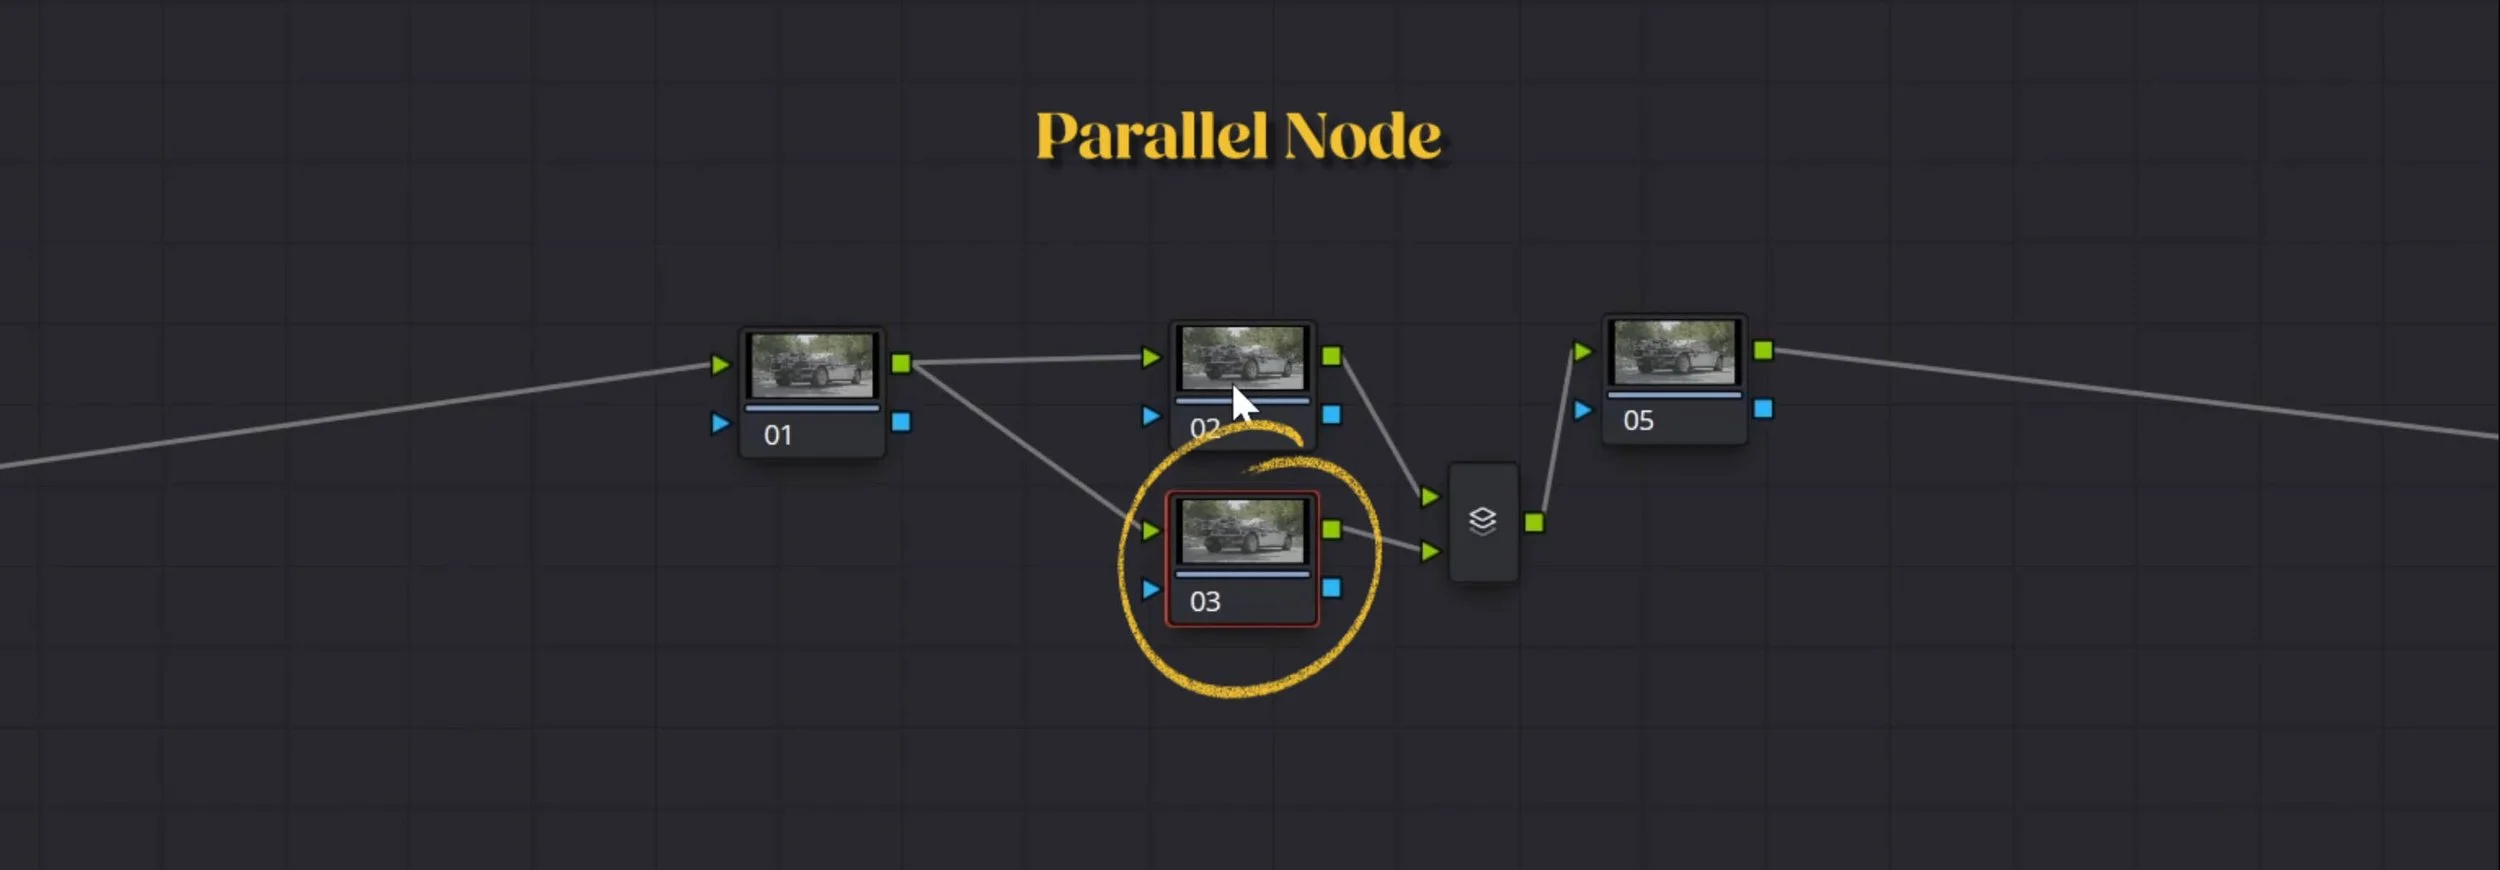
Parallel Node: created in parallel to the selected node; it receives the source from the same origin, and its effect is mixed together with other parallels. A Parallel Mixer node is created automatically. A parallel node is not affected by other parallel nodes.

There are three types of Mixers:
Parallel Mixer (for parallel nodes).
Layer Mixer, which allows the use of Composite Modes (e.g., Screen, Multiply) inside your node tree. If you don’t know these, please read the article on the secrets of the Inspector Tab.
Key Mixer, which can mix together keys from different nodes (fed from the blue output).
Useful shortcuts:
Disable a node: CTRL + D (Command + D on Mac).
Bypass all color grading: SHIFT + D.
Shift node positions among them: hold CTRL/Command and drag one node on top of another.
So, what is the logic for using nodes?
Nodes Logic: One Purpose per Node and Clear Labels
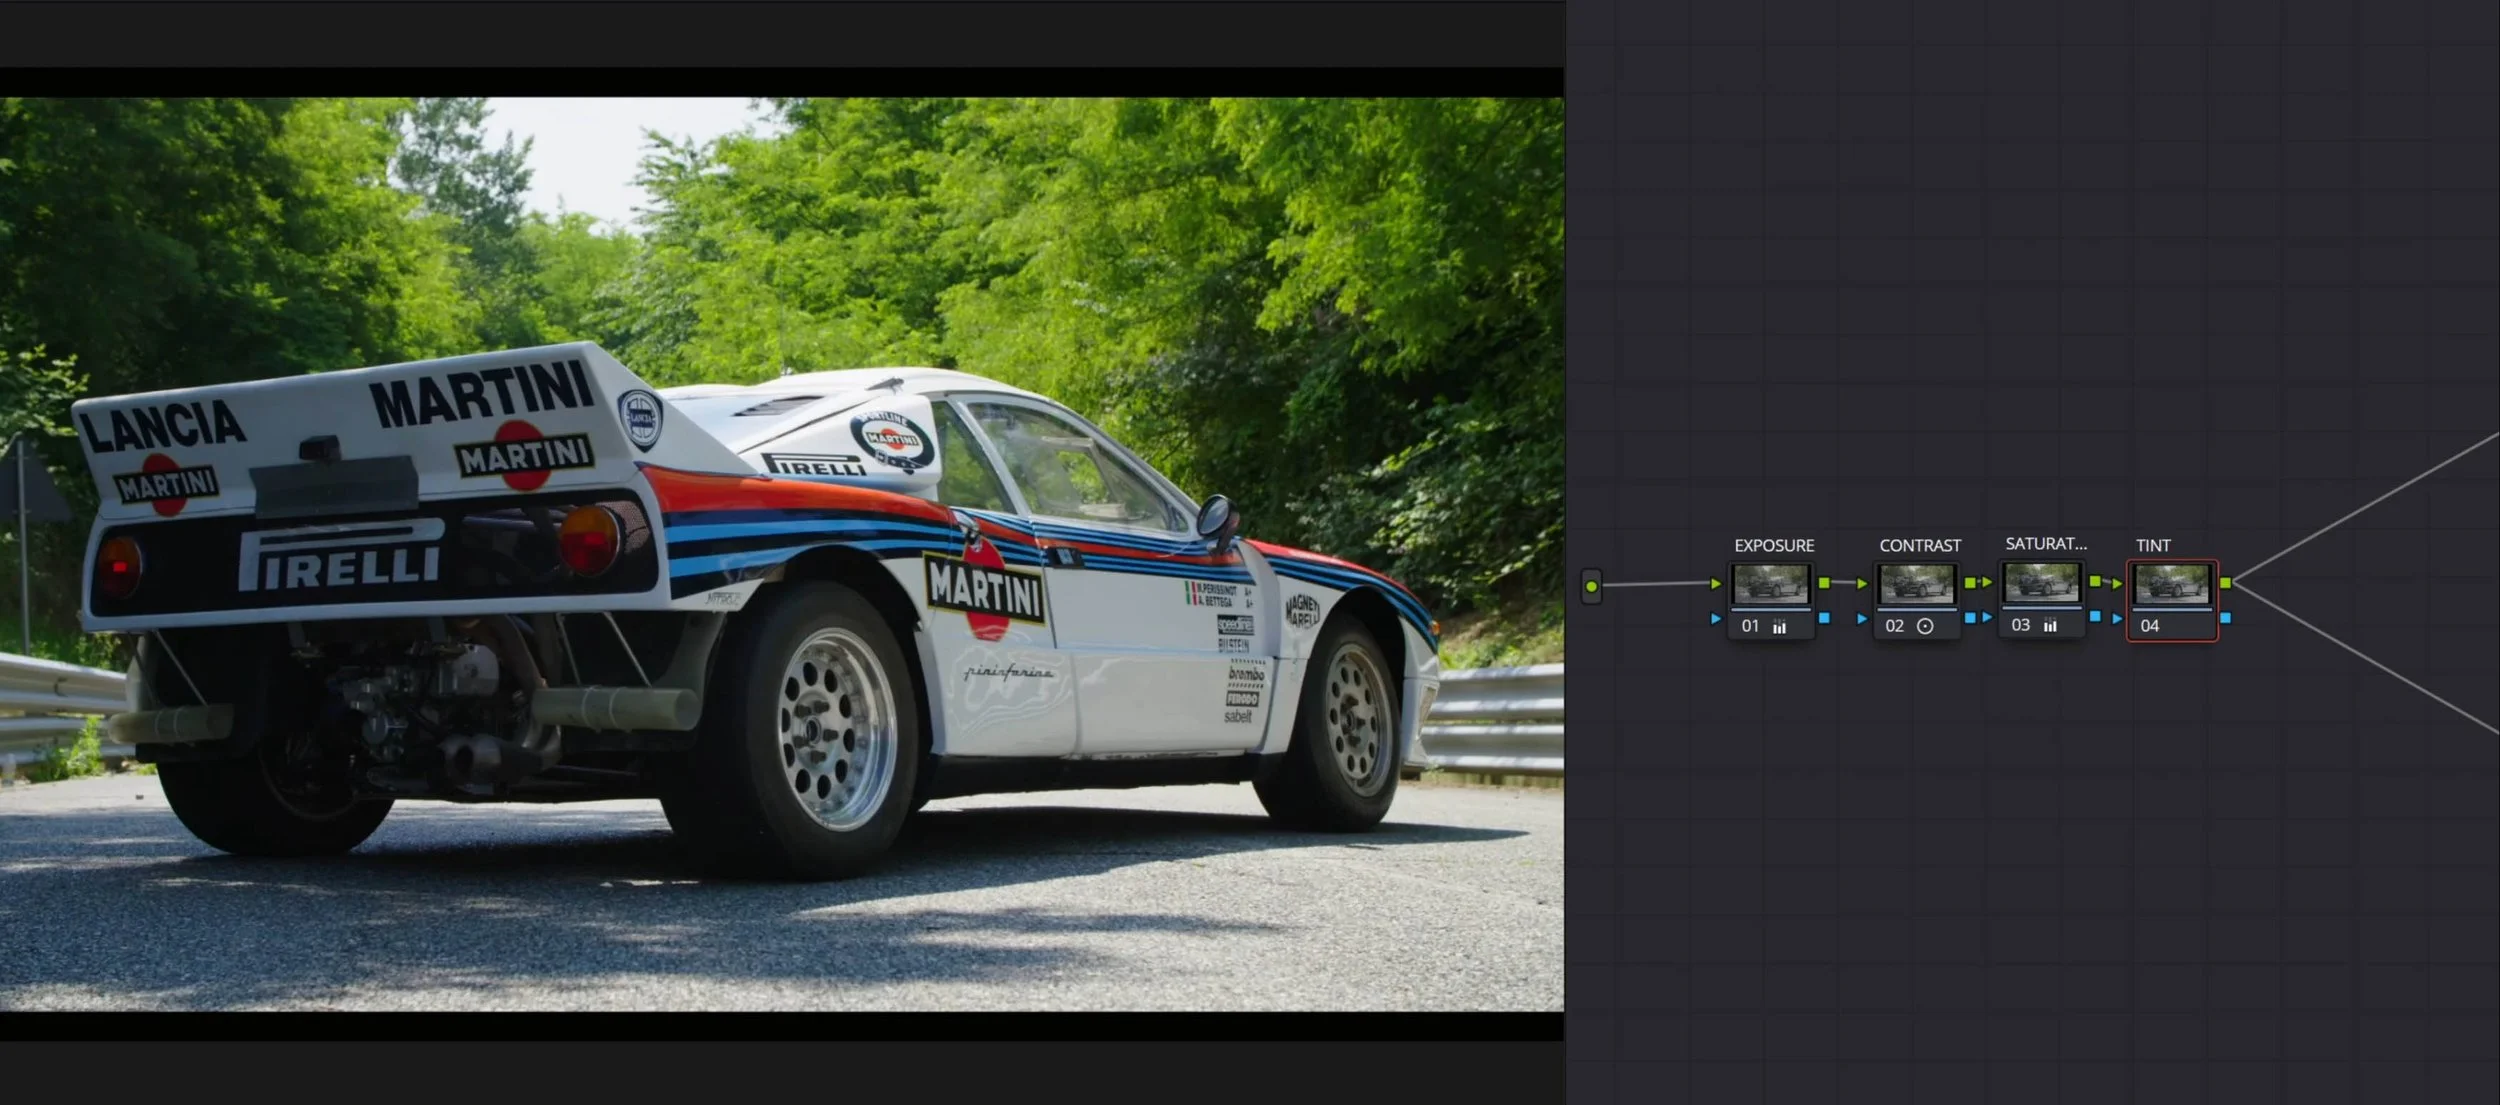
The idea is to do one thing, and one thing only, for each node.
There are a myriad of possible modifications you can apply in DaVinci Resolve and they can be mixed and matched. But if you do too many things in the same node, you risk losing control of your grade and having a hard time walking back if you need to.
For example, in your first node you can change the exposure of your clip, then in your second node you can change the tint. Do not do both in the same node; keep each modification separate so you can toggle them on and off individually and judge each effect separately.
A good rule of thumb is to use meaningful names for each node. If you can give your node a name that explains clearly what it does, then you are using nodes correctly. If you can’t, then you’re probably doing too many things inside a single node.
You can rename your nodes by right-clicking and selecting Node Label. I recommend renaming all your nodes; otherwise, you’ll quickly forget what they are doing.
You can rearrange your nodes in a tidier way by right-clicking and selecting Cleanup Node Graph
You can also duplicate your node tree by pressing CTRL + Y, then move from one grade version to the next by pressing CTRL + N for next and CTRL + B for before.
Primaries and Secondaries: Definitions, Uses, and Node Placement
Let’s start building our node tree. There are two types of corrections you can apply:
Typical primary corrections examples.
Primary Corrections
A primary correction applies to the whole image. The usual primaries are exposure, color balance, saturation, contrast, tint, etc.—any type of modification that can be applied to the entire clip without creating artifacts.
The advantage of primaries is that they make it easier to copy and paste a grade between clips; hence, the more primary corrections you use, the easier it will be to go through your grade. When a scene is properly shot, it is easier to stick to primaries to keep your grade consistent. In fact, most films are graded with just primary corrections.
As a rule of thumb, primaries are made in Serial Nodes, although this is not always the case.Secondary Corrections
A secondary applies only to a portion of the image.
The portion can be selected by an HSL mask (a key of a color frequency), a power window drawn on the image, or a combination of the two. (There will be a separate tutorial in the future about secondaries.)
The advantage of secondaries is that they allow for precise corrections—touching only part of the image. They are very useful when the shot was not done properly (e.g., a dark part) or if a color needs to be changed.
The disadvantage is that secondaries make copying and pasting grades harder, because you’ll have to adjust keys and power windows in each clip. It is also easy to forget about a secondary and leave it where it is not needed, creating artifacts.
Secondaries are usually done in Parallel Nodes, although this is not always the case.
An HSL mask in a parallel node.
Nodes Order: Where and Why to Place the LUT
Let’s get into the order of how corrections are applied.
Let’s start with the LUT. A LUT (Look-Up Table) is a preset that your camera manufacturer provides to convert LOG footage—which looks kind of grey—to Rec.709, the reproduction standard for HD TVs and screens. LUTs can be installed in the system folder of DaVinci and are accessible by right-clicking on the node, selecting LUT, then browsing to the correct one for your shot. (The example clips are shot in Sony S-Log3 SGamut3.) LUTs are a standard in any editing/post-production software, so the same logic applies broadly.
Once applied, your clips are converted to Rec.709. Now the question is: should you start grading after your LUT, or before your LUT?
Common sense suggests grading after, using the LUT as a starting point. But I argue you should grade before the LUT.

Color Grading after the LUT
Why before the LUT?
LUTs apply curves to the image to display it properly, but they also cut out information contained in the LOG file—which is why we shoot in LOG (desaturated and decompressed) to keep details that would otherwise be lost. If you color grade after the LUT, you’ve essentially deleted the power of the LOG file.
Watch the video to see practical examples of how the LUT can delete information in your clip.

Color grading BEFORE the LUT.
Here’s a simple rule for consistency:
Place any node that creates a LOOK near the end of the tree—the look acts as a funnel through which every image passes and gets squeezed. Keep nodes that create custom modifications near the start of the tree, where you are free to move things with the full information available.
Working with CSTs instead of LUTs
A more modern alternative to LUTs is the CST (Color Space Transform). CST converts footage to Rec.709 without using LUTs and follows a logic developed for movies within the ACES framework, meant to be device-independent—your look is not tied to a specific camera or display.
DaVinci Resolve has its own excellent workflow, especially when using multiple camera sources (e.g., a mirrorless and a drone).
Here’s how to Set Up the CSTs:
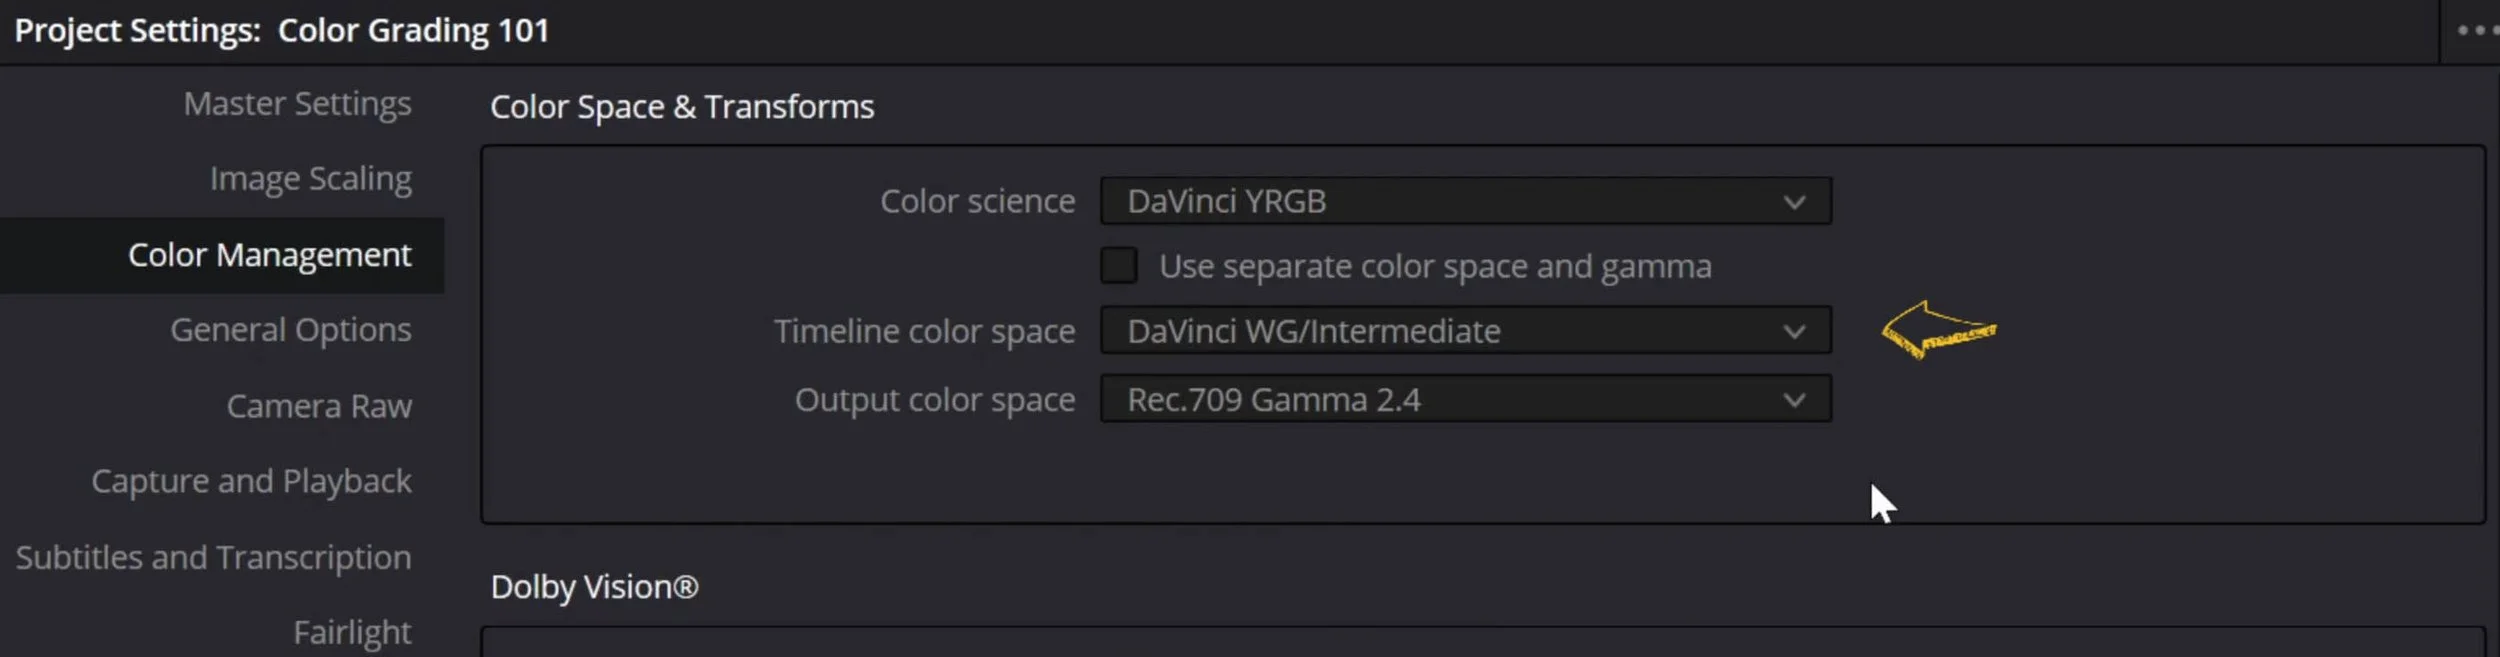
Go to File → Project Settings → Color Management.
Set Timeline Color Space to DaVinci Wide Gamut / Intermediate.
Set Output Color Space to Rec.709 Gamma 2.4.
Delete the LUT and create two nodes.
Go to Effects, search for Color Space Transform, and drag the effect into both nodes.
In the first node, convert from your camera color space (e.g., Sony S-Log3 SGamut3) to DaVinci Wide Gamut / Intermediate—a very large color space—making the grade device-independent from the camera.
In the second node, convert from Wide Gamut / Intermediate to Rec.709 Gamma 2.4, making the grade device-independent from the viewing device.
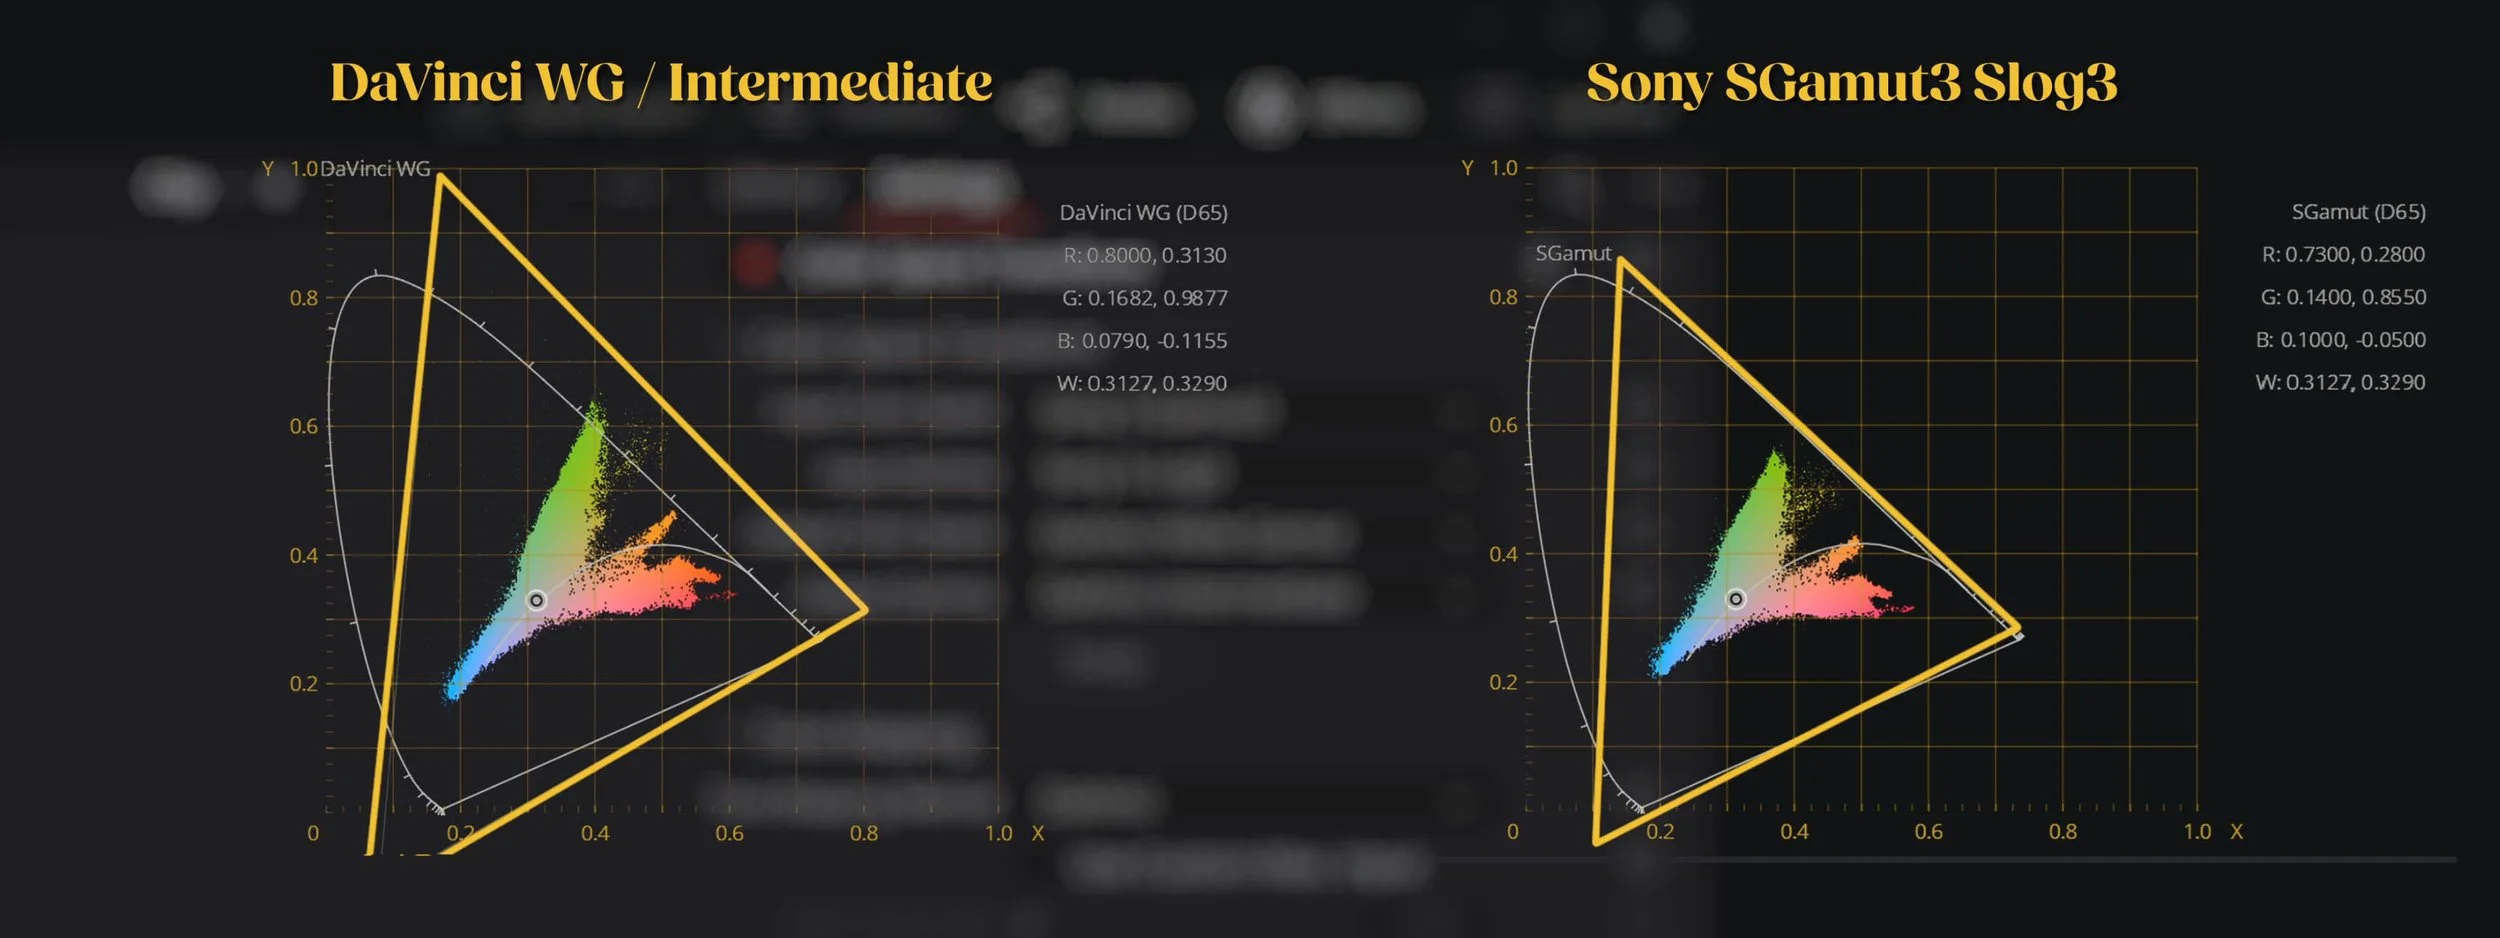
The differences between the DaVinci WG/Intermediate and the Sony SGamut3 Slog3 (the camera) color spaces.
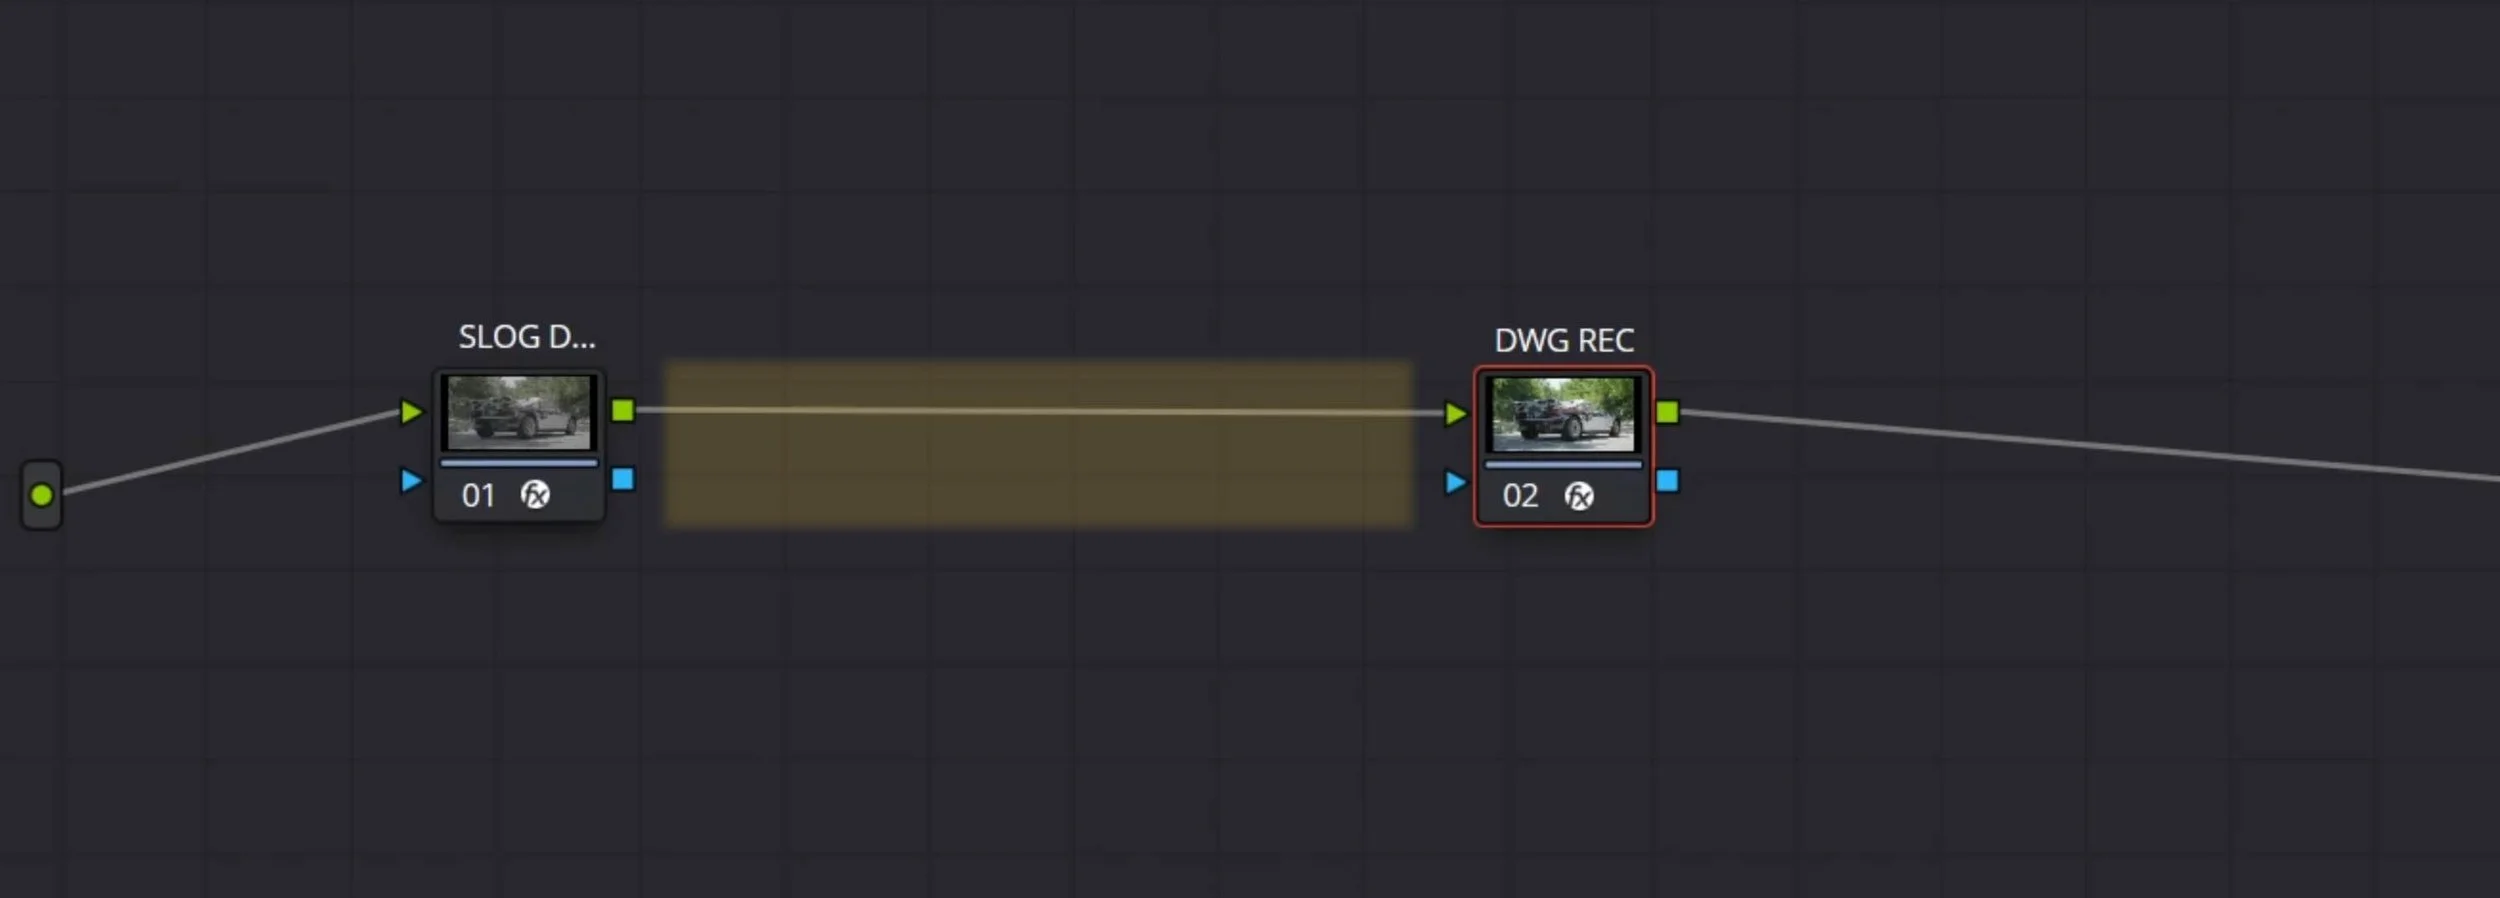
Rename the two CSTs for clarity:
SLOG DWG (camera → DWG/Intermediate)
DWG REC (DWG/Intermediate → Rec.709 2.4)
Your grade is now divided into two areas:
Between the two CSTs in the DaVinci WideGamut Intermediate color space.
Between the two CSTs: the color space is much larger than the normal LOG space—this is the perfect place for Primaries and Secondaries.
After the second CST: build your funnel / LOOK, starting with the Rec.709 conversion.

After the CSTs the color space converts to REC709 Gamma2.4, which is our destination color space.
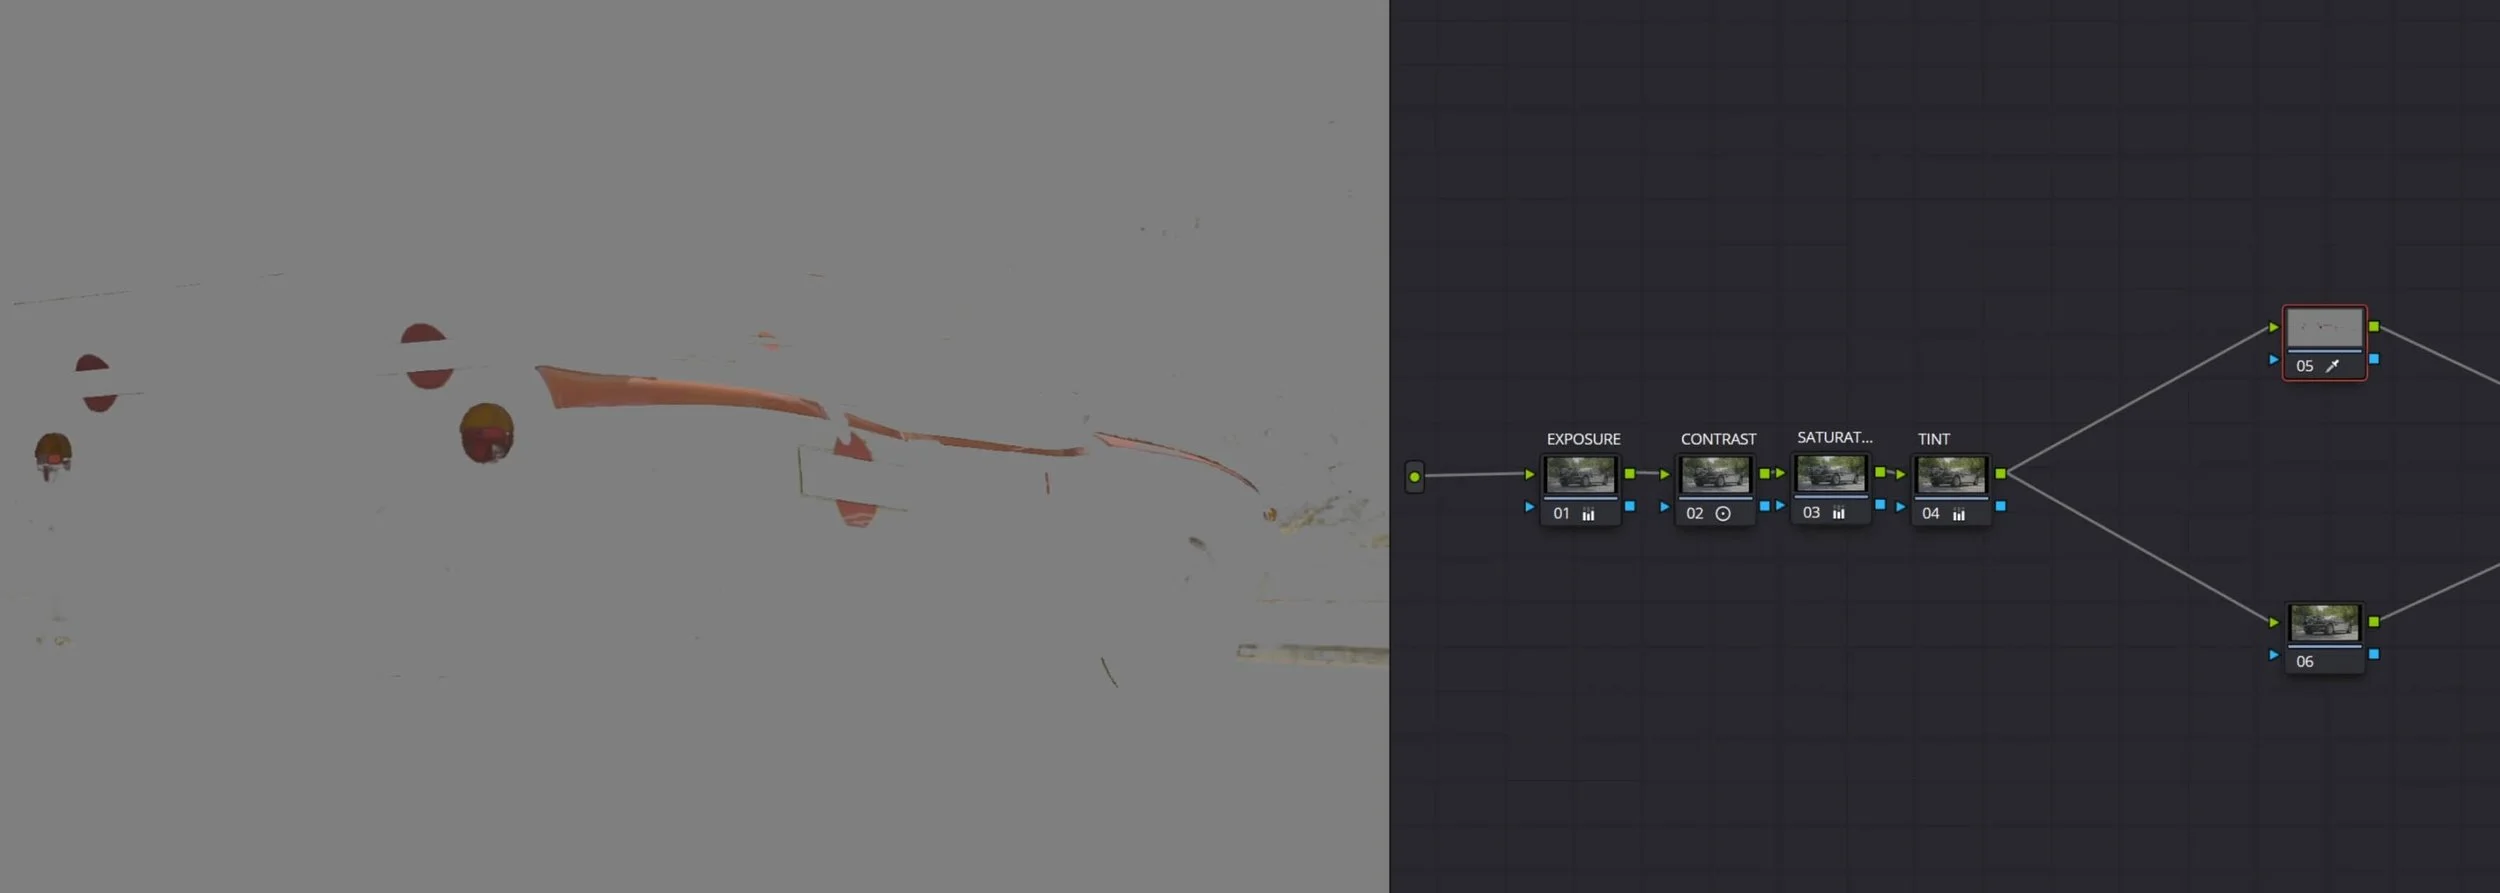
Adding Primaries and Secondaries: Standard Approach and Funnel Variant
Let’s start adding primaries.
The common node tree you will find in other tutorials places two or more serial nodes at the start (between the two CSTs) for Exposure and White Balance (and possibly others), then a series of Parallel Nodes. This is the official, correct way to use nodes, and it’s recommended when starting out.
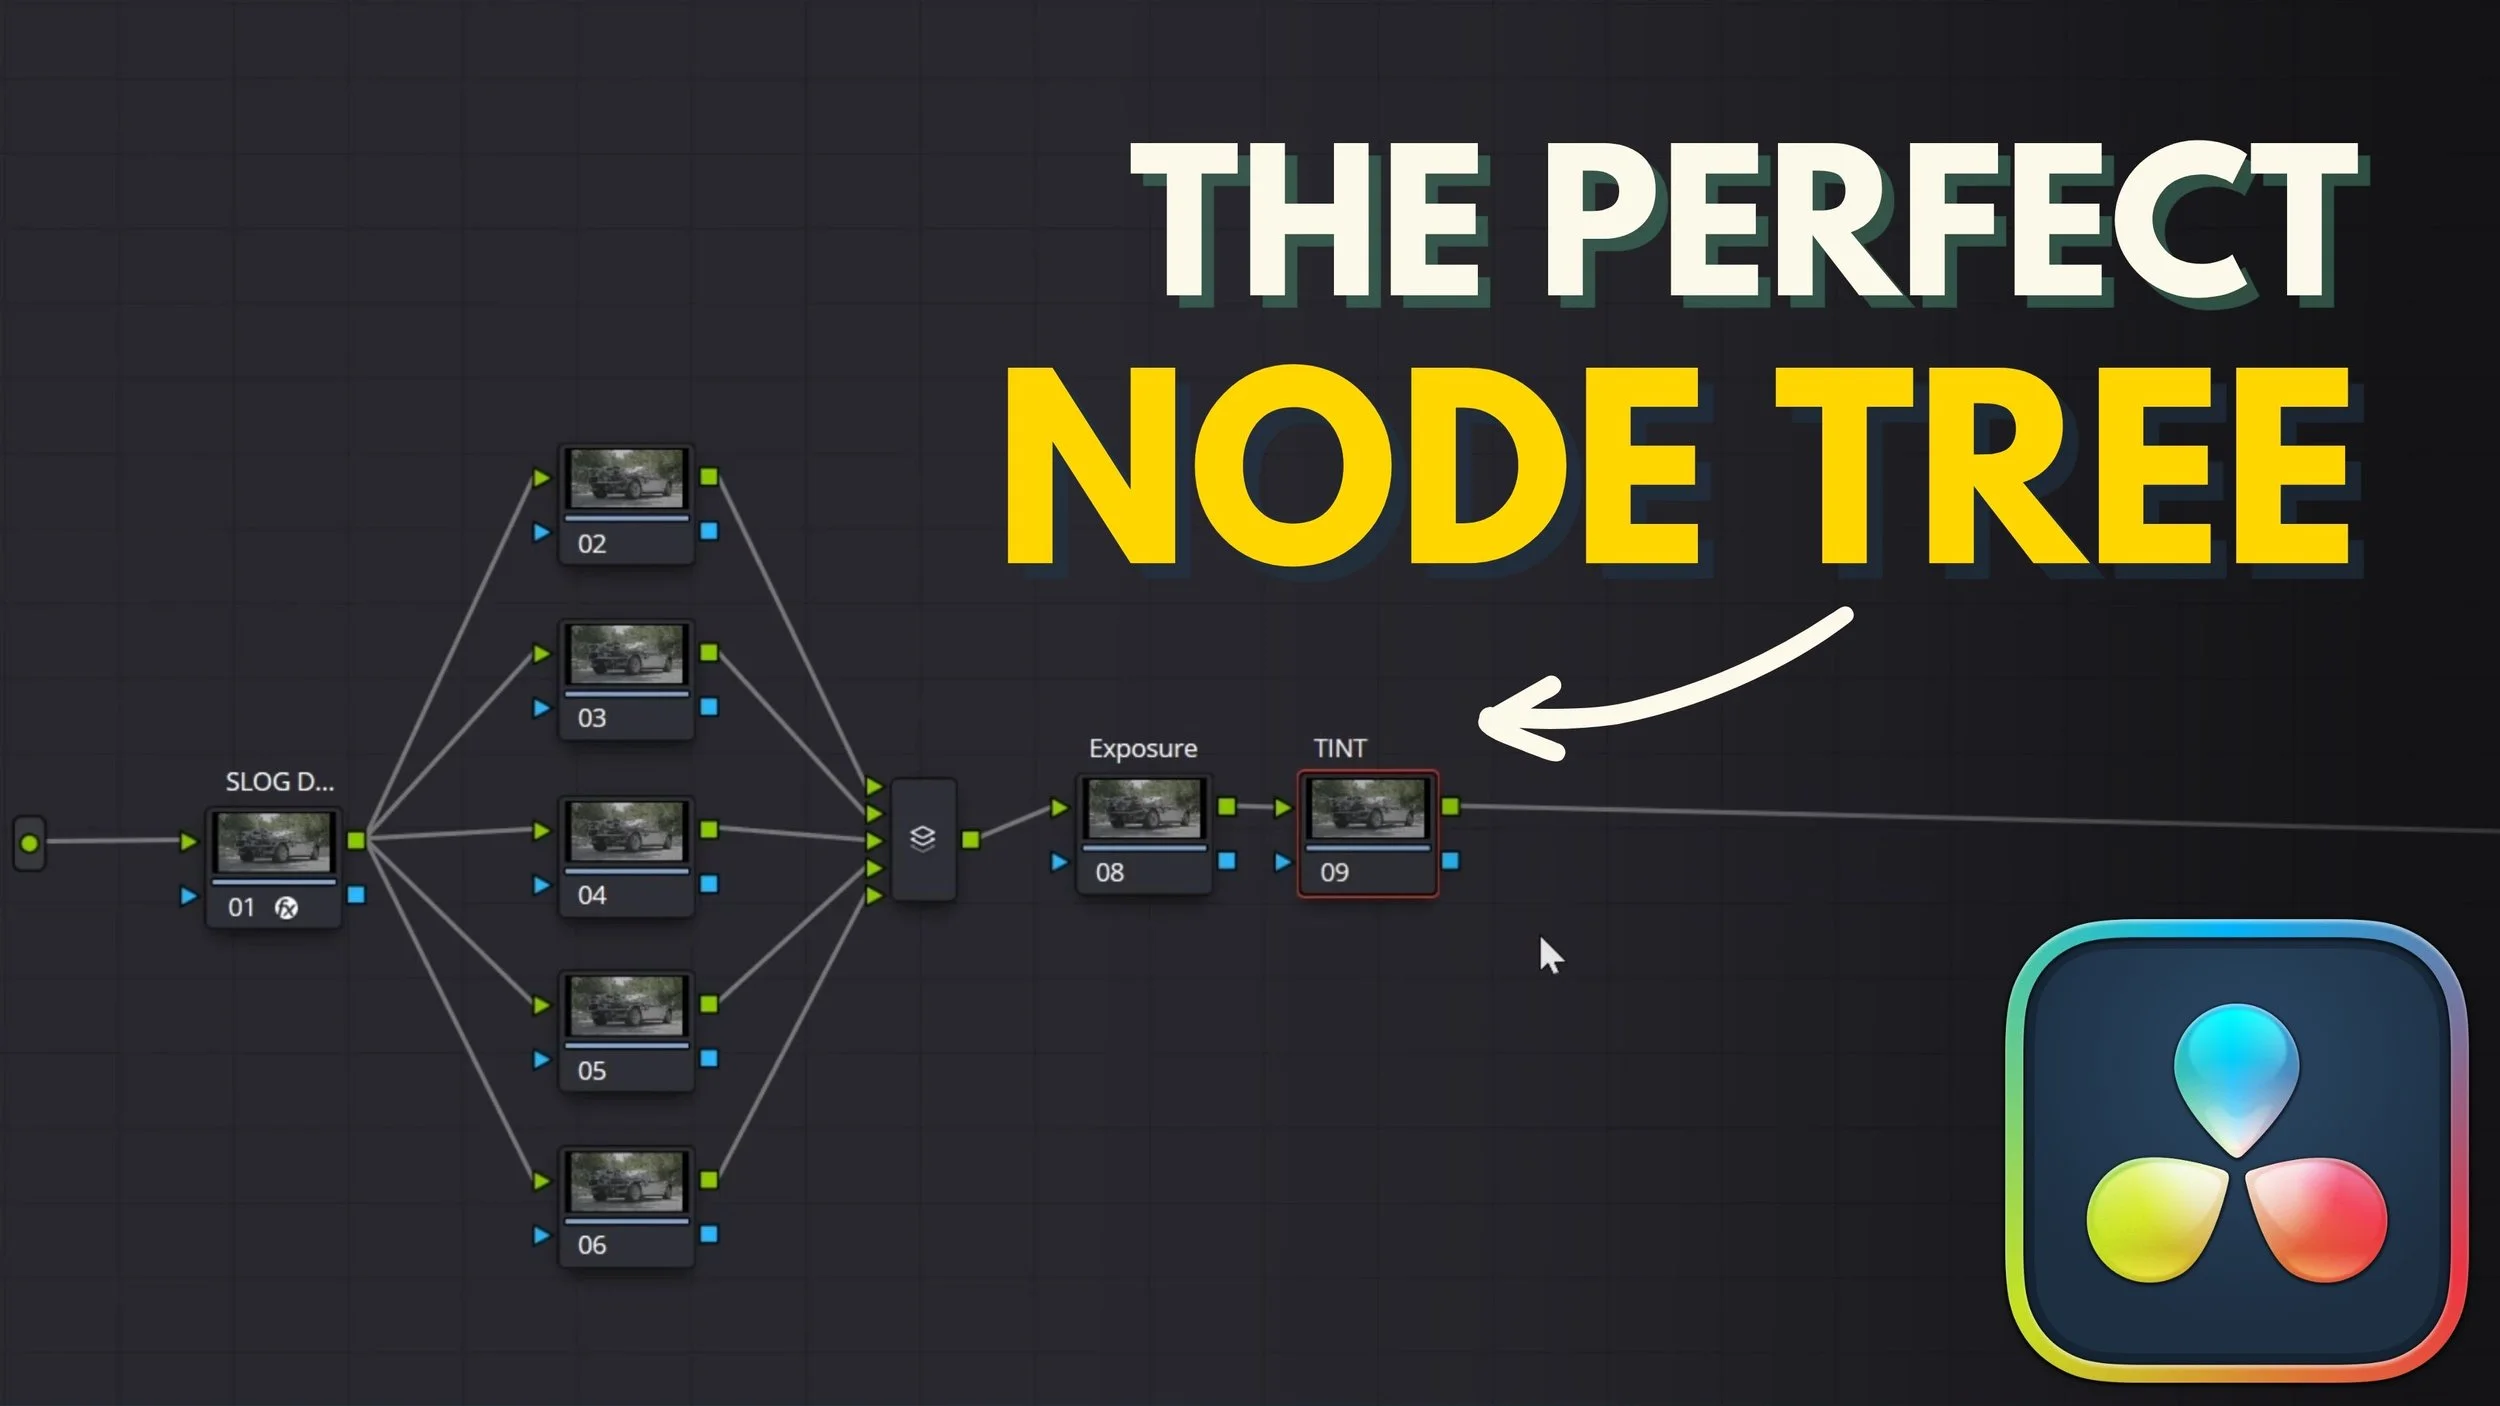
My usual node tree is a bit different and follows the funnel idea:
I start with a series of Parallel Nodes for secondaries—I usually place five—then I place Exposure, White Balance, and so on. I like to tweak exposure and white balance multiple times and I don’t want to lose keys in the secondaries. If secondaries always get their image from the source input, there’s no risk of losing masks (which might happen if they come after primaries).
Then, I create a node for Contrast and Saturation. By contrast, I don’t just mean the Contrast slider, but any effect that changes small, medium, or large-scale contrast—e.g., Texture Pop, Contrast Pop, or a Custom Contrast Mask (download link in the description).
Lastly, I start modifying my color scheme, adding Hues, Tints, and any other slight modifications in how color is represented. For these, I really like Mononodes DCTLs.
After the CST: Effects Placement
There are some effects that work better after the Rec.709 conversion:
Another LUT (creative looks). DaVinci includes some (e.g., the Kodak Film Look), and you can download others. Before using them, check the color space they require; it might not be Rec.709 Gamma 2.4. (The Kodak look, for example, wants Rec.709 Cineon Filmlog.)
Let’s look at other effects:
Film Grain: place at the very end of the tree, in a Serial Node. Grain responds to luminosity; if luminosity changes, so should the grain—hence, last.
Glows and Halations: place before film grain, as they affect luminosity. The same goes for Light Rays, Aperture Diffraction, and Reflections. These are often placed in Parallel Nodes, as it is easier to control them without interacting with each other.
Vignettes: go after the LOOK and before the Glows, because a bright object near a vignette might glow over the vignette, which looks more realistic.
Blurs: usually after the Vignette, but before Glows and (especially) Film Grain. If you place a blur after grain, you’ll simply erase it. Blurs should be placed in a Serial Node (they create artifacts in parallel).
Noise Reduction / Denoise (e.g., Reduce Noise by Neat Video): typically either the first node (before CST) or the second node, depending on how strong the noise is. If noise affects only one part of the image (e.g., a color pushed out of the blacks), you might apply denoise as a secondary in just that area. In that case, place it after the secondaries in a Serial Node, not in a Parallel one—otherwise noise might spill from other nodes.
Final OUT Node: a control node to dial in final blacks, whites, and minor fixes (such as capping saturation). This is the tiny tip of the funnel.
Watch the video tutorial to see a few practical examples of my node tree in use.
Conclusion
If you’re interested in how I made the Custom Contrast Mask, go and watch the dedicated video where I explain how it works.

Please share your thoughts on this tutorial in the comments, and if you have other approaches to node trees, explain them—I’m always interested in how other people think about color grading.


Learn how to use nodes in DaVinci Resolve for professional color grading. This step-by-step tutorial covers serial and parallel nodes, primaries vs. secondaries, LUTs vs. CSTs, and the best node order for consistent, cinematic results.